ID-164-W
Cooperative Extension Service
Purdue University
West Lafayette, IN 47907
Because many of the soils in Indiana are not well
suited for disposal of residential wastewater,
innovative septic system designs often are required
for satisfactory performance. A pressure distribution
system is one such design.
Pressure distribution systems are used primarily when
the soil disposal area is located upslope, or too far
away from the septic tank to obtain gravity movement
of effluent. They also are recommended for use in
sandy soils to ensure adequate treatment of
wastewater.
This publication describes the construction procedure
for the installation of a pressure distribution system
following the final design approval by the health
department. The following items are discussed:
system location, trench construction, and the
construction and installation of the pressure
distribution network. Septic tank and pump chamber
installation also are discussed.
These guidelines should aid contractors and
do-it-yourself homeowners in applying the design
information supplied by a consulting engineer and the
Fast Agricultural Communications Terminal System
(FACTS) computer program, RWASTEII (FX-89), available
at the Cooperative Extension Service office. The
RWASTEII program also is available in C-Language for
use on personal computers that are IBM compatible.
RWASTEII recommends a specific type of system best
suited to a particular set of site and soil
conditions, and to provide specific design
information. The program estimates the amount of
gravel needed for construction as well as suggesting
system layouts which will best fit the shape and size
of disposal area available. The program will also
size the pump and piping needs of the pressure
distribution network. The design recommendations must
then be reviewed and altered to fit the actual
features of the site by a consulting engineer.
Pressure Distribution
Nonconventional types of septic systems require
more care than conventional ones in site selection,
design, and construction. This is due not only
because the contractor is apt to be less experienced
with pressure distribution installation but, also
because soil and site conditions may be difficult.
These systems differ from traditional gravity systems
in that a small pump and a relatively small diameter
pipe (usually 1-2.5 inches) is used to transfer the
septic tank effluent to the disposal area. Carefully
sized and spaced holes in the pipes laid in soil
trenches result in a uniform application of wastewater
to the soil.
Good construction techniques are essential if pressure
distribution is to function properly. If followed
carefully, they will help ensure many years of
trouble-free operation. Consider the following
step-by-step procedure:
A. Site Selection and Layout
Step 1: The selected site must be one that
sheds water. The long axis of the soil disposal area
must be oriented parallel to the contour of the slope
(i.e., lines of equal elevation). Try to avoid areas
where the long axis would run up or down the slope or
where wastewater movement will converge (Figure 1).
Because a pump generally is used to pressurize the
system, the soil disposal area can be located upslope
from the home. (Of course, this would not be an
option if a siphon is used to pressurize the system).
A contour or topographic map is rquired to determine
the best layout (Figure 1).
Figure 1. Proper orientation of trenches on complex slopes.

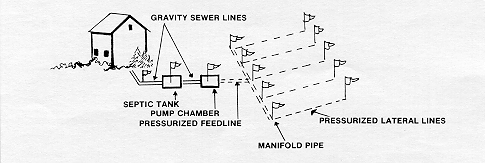
Step 2: Lay out and stake the
location of the feedline trench, septic tank, and pump
chamber (Figure 2). Their exact locations may be
dictated by minimum distance requirements from water
supplies, structures, property lines, and bodies of
water as outlined by Indiana State Board of Health
regulations. These setback distances are also part of
the FACTS program.
Figure 2. The entire system, including the location of the septic tank and pump chamber, should be layed out and staked before construction.
Step 3: Stake the center line of
all soil trenches. Trenches should be spaced a
minimum of 7.5 feet center-to-center, or as specified
by the computer program. The greater the slope or the
more impermeable the subsoil, the greater the spacing
needed to keep from overloading the soil of the lower
trenches since wastewater will tend to move more
horizontally than vertically.
Step 4: The area required for the
soil absorption system, and an additional distance of
at least 50 feet downslope from the field should be
fenced. This will prevent disturbance, scalping, or
compaction of the soil absorption area by vehicular
traffic or construction equipment. All traffic should
be prohibited from the area before, during, and after
the construction of the home and installation of the
septic system.
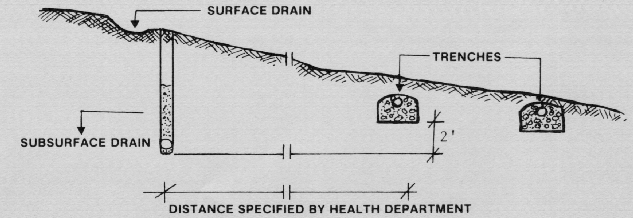
Step 5: If the soil is classified as
poorly or very poorly drained, or if the trenches are
to be constructed on the side or at the base of a
slope, install a diversion ditch and/or subsurface
curtain drain (one backfilled with gravel and
extending to the limiting soil layer or to at least 2
feet deeper than the elevation of the planned trench
bottom, Figure 3) above the system to keep upslope
runoff and seepage water away from the system.
Subsurface drains generally are necessary to help
control the water table below the field. Keep the
subsurface drains at the distance specified by the
health department from the outside edge of the
field.
Figure 3. Locations of subsurface and surface drains.
B. Trench Excavation and Preparation
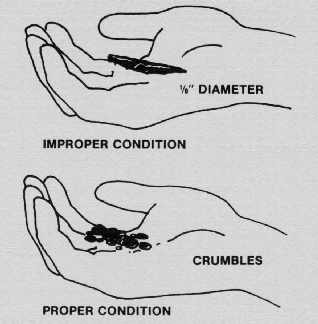
Step 1: The trenches should only be
excavated when the soil is dry and friable. Smearing
and compaction due to construction in a wet soil
decrease the soil's ability to absorb wastewater. If
a sample of the soil at trench bottom depth forms a
ribbon (e.g., 1/8-inch diameter) when rolled between
the palms of the hands, the soil is too wet to
excavate. If the soil crumbles, excavation may
proceed (Figure 4). This preexcavation investigation
is essential to help ensure proper operation of the
system.
Figure 4. Construction must not take place if soil is too wet.
Step 2: Trenches should be kept as
shallow as possible to take advantage of the more
permeable horizons near the soil surface. The FACTS
program will automatically do this by specifying the
trench bottom depth for the site.
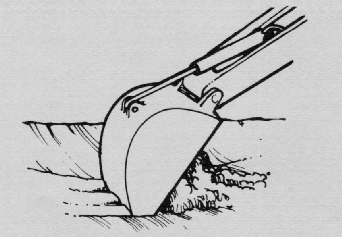
Excavate lateral trenches to design depth and width
while frequently checking their bottom elevations with
an engineer's level to ensure the trench bottoms are
level over the length of each trench. After most of
the soil is removed, use an excavating bucket with
teeth to rake each trench bottom to final bottom
elevation (Figure 5).
Figure 5. Keep backhoe bucket perpendicular to trench bottom to minimize compaction.
Sides of lateral trenches should also be raked to a
depth of 1 inch to expose the natural soil structure
and to remove any smeared and compacted soil surfaces
caused by the excavating bucket. This can be
accomplished by attaching fabricated raker teeth to
each side of the bucket (Figure 6). Foot traffic on
the excavated trench bottoms should be minimized to
prevent further compaction. If foot traffic is
necessary, use planks to spread out the workers'
weight.
Figure 6. Fabricated raker teeth to reduce compaction and smearing of trench side walls.

Step 3: Excavate a narrow trench for
the manifold pipe between the lateral trenches either
at one end or in the center of the soil disposal area,
depending on the lateral pipe layout recommended by
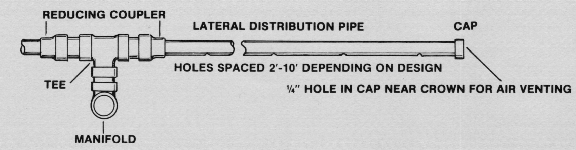
FACTS program. To prevent plugging or freezing,
the manifold must be placed so that it will drain
between doses. It should drain into the lateral
distribution pipes (Figure 7) or back to the pump
chamber if connected to the lateral distribution pipes
from below (Figure 8). Then excavate another trench
for the feedline, either from the center or from one
end of the manifold trench to the pump chamber, along
the path staked out in Step 2 of Part A. The feedline
should also be laid at a slope that permits drainage
between doses to the pump chamber. Otherwise, the
feedline must be placed below the frostline (about 40
inches in most of Indiana).
Figure 7. Sanitary cross connection. Drill 1/4-inch hole on underside of manifold downslope end with feedline drainage to pump chamber.
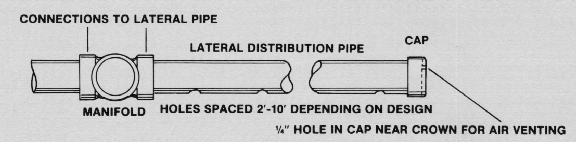
Figure 8. Tee-to-tee connection. Feedline and manifold must drain back to the pump chamber.
Once the properly sized manifold and feedline are laid
to the desired grade and connected to the lateral
piping, place soil around the manifold pipe and
compact it well to prevent wastewater from seeping
along the manifold from one lateral trench to the
next. This is especially important on sloping sites
where successive lateral pipes and trench bottoms are
placed at lower elevations.
Step 4: Monitoring wells, which
allow evaluation of the performance of the absorption
field once it is in operation, should be installed at
this point in construction of the system. These wells
are usually 4-inch diameter PVC pipe. Each monitoring
pipe is perforated with 1/2-inch holes over the lower
6-inch length. It extends to the ground surface and
is covered with a friction fit cap or screw cap.
Monitoring wells should be located in several
trenches, extending from the trench bottom to the
final surface grade (Figure 9). This will provide a
means of evaluating the depth of ponding in a trench,
a measure of the system's performance.
Figure 9. Monitoring wells shown in completed trench and outside of absorption field.
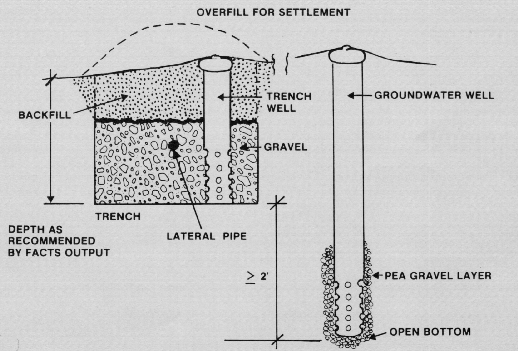
After completion of the system monitoring wells also
can be installed outside the absorption field to
evaluate seasonal groundwater levels which will affect
the system's performance. These wells should extend
to a depth of 40 inches or at least 2 feet below the
elevation of the nearest trench bottom, whichever is
greater.
C. Pressure Distribution Network Installation
Step 1: Carefully place washed Indiana State
Highway Specification (Spec) #5 aggregate, or other
trench fill material which has been approved by the
County Sanitation, to a depth of 6 inches over the
bottom of the trenches. Finally, level the
aggregate.
Step 2: The lengths and diameters of
the distribution lateral pipes will be provided by the
FACTS program. All pressure distribution piping and
fittings should be schedule 40 PVC plastic
(ASTM-D-1785). First, lay out the pipe in each
trench. Clean all glue joints with a solvent. Apply
glue to both male and female sections of the joint,
then join. Twist slightly to create a leak-proof
connection. Glue a cap to the lateral pipe end that
is away from the manifold.
Step 3: Starting from the uncapped
end of the lateral, the first hole is drilled at 1/2
the hole spacing distance. The following holes are
then drilled at the specified hole spacing distance
until the end is reached. These holes should be
drilled in a line along the length of the lateral
pipe. When finished all holes should face the same
direction. On the top side of the end cap opposite
from the row of dosing holes, drill a 1/4-inch
diameter air release hole to ensure that all
wastewater drains from the lateral pipe after each
dose (Figure 10).
Figure 10. Air release hole ensures that all wastewater drains from the lateral pipe after each dose.
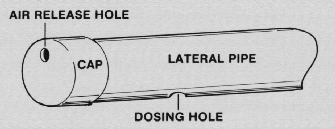
Remove all burrs around the dosing holes, both inside
and outside of the pipe, taking care not to enlarge
any hole beyond its design diameter. Be sure to
remove any loose chips from inside the lateral pipes
to prevent possible clogging of the dosing holes. If
the various parts of the network have been carefully
identified, the hole drilling and capping can be done
in a shop or workroom and then taken to the site for
assembly.
Step 4: Assemble the network on top
of the aggregate in the lateral trenches. Make sure
the dosing holes of each lateral pipe are facing
downward (the invert side of the pipe) before
connecting the laterals to the manifold. Also, make
sure each lateral pipe is level over the entire length
of the trench by using a carpenter's or engineer's
level.
D. Backfilling the Trenches
Step 1: Carefully cover the pipe network
with additional washed Spec #5 gravel or approved
aggregate to a depth of at least 2 inches above the
crown of the pipe.
Step 2: Next, place a backfill
barrier such as a synthetic fabric filter, 4-6 inches
of marsh hay or straw, or untreated building paper
(red rosin) over the aggregate cover.
Step 3: Backfill the trenches with
excavated soil and compact slightly. Mound the soil
4-6 inches over the top of the trench to allow for
settlement (Figure 11). Individual trenches can be
excavated and completed in sequence for ease of
construction.
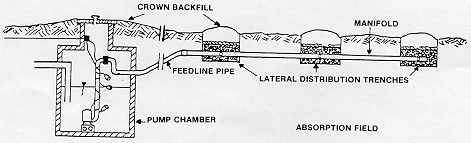
Figure 11. Crown backfill over tanks and trenches.
Step 4: Since settlement may take
6-12 months, the construction area should be resodded
or reseeded immediately using grasses adapted to the
area.
E. Septic Tank and Pump Chamber Installation
Step 1: Excavation depths for the septic
tank and pump chamber are determined largely by what
is necessary to obtain gravity flow in the sewer from
the point where it leaves the house. A two percent
slope is required for the house sewer to the septic
tank while a one percent slope is sufficient for a
pipe carrying septic tank effluent. Make sure both
tanks are tightly sealed against groundwater seepage
before installation. The pump chamber should be the
same size or larger than the septic tank to allow for
at least one day of reserve storage of effluent after
the high water alarm is activated due to pump or float
failure.
Step 2: Carefully level both the
septic and pump tanks for proper operation after their
installation. Access must be provided to all parts of
both tanks to allow for inspection and maintenance.
Use 4-inch diameter PVC sewer pipe (ASTM-D-2665, 3033,
or 3034) with water tight connections between the
house and the septic tank and between the septic tank
and pump chamber. Footing and roofing drains
must not be connected to the septic system.
Crown backfill to a height of 6 inches over the tanks
to allow for settling and to divert surface runoff
(Figure 11).
Step 3: Install a submersible sewage
effluent pump or siphon in the pump chamber that has
the head and discharge
characteristics recommended by the FACTS
program. This recommendation is designed to balance
pump characteristics against the hydraulic
requirements of the piping network. Try to select a
commercially available pump with a high confidence
factor (a measure of the pump's ability to meet the
head and discharge requirements of the piping network)
from the list of pumps generated by FACTS. Do not
select a pump that is different from those recommended
unless the FACTS program was used to redesign the
piping network for the characteristics of that
particular pump. The proper pump or siphon should
give an even discharge from all dosing holes in the
soil disposal area. Set the pump 6-8 inches above the
tank floor on a large platform of cement blocks to
prevent settled sludge from interfering with the
operation of the pump and piping network (Figure
12).
Figure 12. Cross sectional layout of pump chamber and associated components.
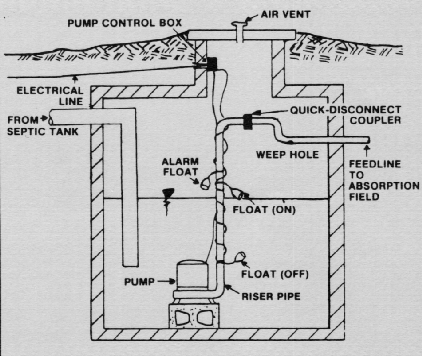
Step 4: Plumb the pump to the
feedline with a riser pipe and quick-disconnect
coupler so the pump can be removed easily for
inspection and maintenance (Figure 12). The
quick-disconnect coupler should be located near the
access of the pump chamber to reduce the difficulty of
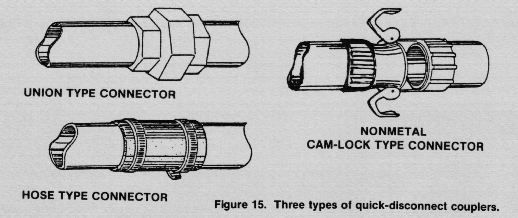
disconnecting the pump. Common couplers include
rubber or hose couplings anchored to the pipe ends by
hose clamps or plastic PVC unions. One coupling which
allows for quick disconnection or connection is the
cam-lock type connector used on fire hoses (Figure
13). Where practical, connectors should be made of
plastic instead of metal because the tank environment
is quite corrosive. If an effluent pump is used, a
1/4-inch weep hole should be drilled on the underside
of the feedline to allow drainage after each
dose.
Figure 13. Three types of quick-disconnect couplers.
Step 5: Make the electrical
connections from the pump to the control circuitry.
The pump operation should be controlled by external
mercury float switches (allowing easy adjustment of
the dose volume) rather than a diaphragm controller
built into the pump body. Install a high-water alarm
float, approximately 3 inches above the high-water
control float, on an independently fused A.C. circuit
to alert the owner of a malfunction. All electrical
leads should be strapped to the riser pipe of the
pump, and should be long enough to allow the pump and
floats to be removed from the chamber without
electrical disconnection. Use nonmetallic, tamper and
weatherproof electrical boxes for all electrical
connections. The connection box may either be mounted
in the basement of the house or near the access to the
pump chamber. Be sure that the electrical circuitry
is grounded properly for the safe operation of
electrical equipment in a wet environment (according
to the National Electrical Code).
F. Maintaining the System
Traffic and construction must be avoided over and
immediately downslope from the soil disposal area to
prevent compaction and to minimize frost penetration.
You should maintain a good grass or vegetative cover
over the area to maximize the uptake of water. You
also should provide the homeowner with a layout
diagram of the septic system, referenced to the house
and lot boundaries. This will enable location of the
tanks and absorption field for future maintenance.
Sludge should be removed from the septic tank and pump
chamber every 3-5 years. This clean-out schedule is
even more important with pressure distribution systems
than with standard gravity fed systems to avoid
carryover of solids to the disposal trenches.
Carryover solids can plug the pressure distribution
pipe openings in the trenches.
Homeowners should be encouraged to monitor the
performance of the septic system by routinely checking
for the presence and depth of water in the monitoring
wells during spring, summer, and fall. Any
progressive increase in ponding depth within the
trenches over time may be indicative of future
problems.
Water conservation measures in the home help to ensure
the soil disposal area will not be overloaded. It
would be wise to install faucet aerators and low-flow
fixtures and appliances when possible.
Operating and Maintaining the Home Septic System (ID-142)
is a helpful Cooperative Extension publication that is
written for the homeowner. This publication and the above
recommendations should help the homeowner better
understand the operation and maintenance of their
on-site septic system for many years of trouble-free
operation.
Additional Assistance
In addition to the FACTS computer program located at
each Indiana County Cooperative Extension office,
assistance in selecting and designing an on-site
system is available from your local county health
department and your local Soil Conservation Service
(SCS) office. In addition, some assistance may be
available for design of innovative systems from the
Purdue University On-Site Waste Disposal Project,
Agronomy Department, West Lafayette, IN 47907.
NEW 1/85 (3M)
![]() Cooperative Extension Work in Agriculture and Home Economics,
State of Indiana, Purdue University and U.S. Department of Agriculture
cooperating. H.A. Wadsworth, Director, West Lafayette, IN. Issued in
furtherance of the Acts of May 8 and June 30, 1914. It is the policy
of the Cooperative Extension Service of Purdue University that all
persons shall have equal opportunity and access to our programs and
facilities without regard to race, color, sex, religion, national
origin, age, or handicap.
Cooperative Extension Work in Agriculture and Home Economics,
State of Indiana, Purdue University and U.S. Department of Agriculture
cooperating. H.A. Wadsworth, Director, West Lafayette, IN. Issued in
furtherance of the Acts of May 8 and June 30, 1914. It is the policy
of the Cooperative Extension Service of Purdue University that all
persons shall have equal opportunity and access to our programs and
facilities without regard to race, color, sex, religion, national
origin, age, or handicap.