NCR-191
The cold, strong winds and large snowfalls of recent Midwest winters have caused many farm families to re-evaluate the need for "controlling" these energy-wasting disturbances.
There are no foolproof methods of wind and snow control, since the amounts of precipitation and the wind speed and direction constantly change. However, a protective system based on prevailing winter winds and average snowfall frequencies can significantly minimize their severity and effects on a farming operation. And the benefits of these improvements may well be realized year round.
This publication discusses briefly the principles of wind and snow control, then examines the types of control systems that might be used around the farmstead. Finally, it provides planning guidelines for minimizing wind and snow problems.
The following basic principles of control will help us understand the reasons for taking certain approaches to wind and snow problems:
As we discuss the problems of wind and snow control, bear in mind that these principles apply to all objects that will slow the velocity and/or change the direction of the wind. Such objects include windbreaks, snow fences, farm buildings, silos, trees and shrubs, shelterbelts, terrain surfaces and configurations, etc. What we can do to control the velocity and direction of wind will usually also control snow, because wind-driven snow causes drifting snow.
There are various systems for changing wind direction and reducing its velocity to control wind and snow. We will consider them individually, pointing out how each works and why, and where it would likely be most effective.
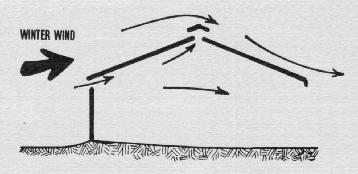
As wind slams into a solid fence, it is either forced up and over the obstacle or around it. Air pressure increases on the upwind (windward) side, and a slight vacuum is created on the downwind (leeward) side. As the wind is forced over the top of this solid barrier, its velocity increases. After crossing the top of the barrier, the vacuum created on the downwind side causes air turbulence which dissipates the wind's energy. The wind no longer retains enough energy and velocity to carry a snow load; therefore, the snow drops out.
Wind drops the snow in two places: (1) on the upwind side of the fence at a 45-degree angle for a distance of about one-fence-height, and (2) on the downwind side for a distance equal to about five times the fence height (Figure 1). The distance of snow drop on the downwind side is not directly proportional to fence height, and the effect is somewhat less than five times the height for very high fences. The area of wind and snow protection for a solid fence, then, extends from about five to fifteen times the fence height downwind.

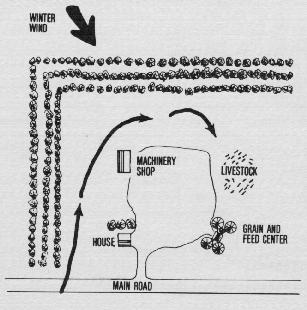
A solid windbreak is usually built adjacent to the area it is designed to protect, since snow accumulation does not usually extend out far from the fence. It is most commonly used to block or divert wind away from a livestock feedlot.
Windbreak fences require sturdy construction, since they take the wind's full force. Pressure created by the wind increases rather significantly as fence height increases. For instance, as wind speed increases from 10 to 30 miles per hour (mph), the force on a solid fence increases nine times.
Figure 2 and Table 1 provide details on solid fence construction.
Canadian studies* have determined that fences with 25-50 percent open space are more effective in controlling wind than solid fences. Also, while open fences drop more snow than solid fences, they create shallower drifts on the downwind side. This speeds snow melting in the spring and snow removal after storms.
Open fences are commonly used to protect roadways, open-front buildings and livestock feedlots. The fence should be located far enough upwind to keep the protected area out of the snow drop zone.
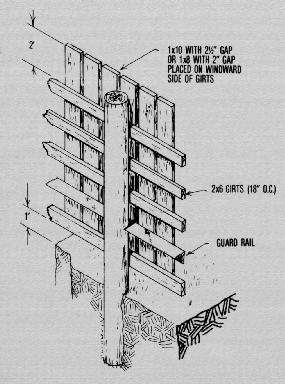
Fence openings should be 2 to 2 1/2 inches wide and may run vertically or horizontally. Openings wider than 6 inches are ineffective. Conventional picket snow fence and other fencing which are 25-50 percent porous make excellent windbreaks. Wind speeds up as it passes through the restricted openings, thus preventing snow from plugging the immediate area around the fence.
Open fences should also be mounted off the ground about 12 inches. This allows the wind to keep sweeping the snow downwind from the fence, thus maintaining its effectiveness.
Wind velocity and fence height determine the size of the protected area. For instance, when the wind is blowing at 10 mph, a 6-foot-high porous fence will reduce that velocity to a minimum 10 feet downwind from the fence. When the wind is 20 mph, the minimum velocity point will be 65 feet from the fence; and at 30 mph, the area protected is about 90 feet downwind.
As a general rule, wind protection is usually adequate for a distance equal to about 20 times the fence height, whereas the major snow drop is in an area downwind equal to about 10 times the fence height (Figure 3).
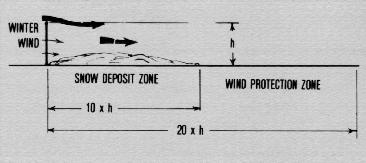
Figure 4 and Table 1 provide details for open-fence construction.

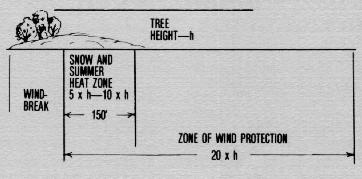
Shelterbelts are trees planted in several rows and act similarly to porous fences in controlling wind and snow (Figure 5). However, they protect a much larger area than do solid or open fences and are often used to protect the entire farmstead. They are most effective if located about 150 feet upwind from areas to be protected (Figure 6). The base of the trees should be trimmed out to 10-20 percent of their height, to keep snow from clogging the windbreak and the area immediately downwind.
    Fence    Pole    Depth pole     Number
   height   length   is embedded   of girts
---------------------------------------------
      6'      8'        3'-6"        3
      8'     10'        3'-6"        4
     10'     12'        4'-O"        5
     12'     14'        4'-O"        6
---------------------------------------------
     *Construction is as shown in Figures 2 and 4
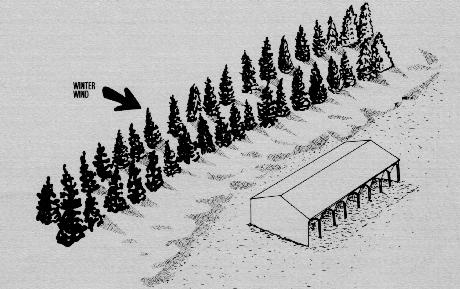
A shelterbelt consisting entirely of deciduous trees (those which drop their leaves in winter) is ineffective for control, because it does not offer enough resistance to air passage. Also, trees planted too densely will have a limited zone of protection, just as any solid windbreak. Some shrub plantings are effective, even without foliage, if branch density is great enough.
From a heat-management standpoint, the best trees to plant around a home or farmstead area are coniferous (evergreen) species on the north and west sides to break the winter wind, and deciduous trees on the south side to provide summer shade and let the winter sun through.
Tree selection and location are important. For example, a building "protected" by pine trees could actually have a higher heating cost than one located in an open area. While the pines can diminish winter winds to reduce cold air infiltration, they could also shade out the benefits of winter solar heat if improperly placed.
Trees should be placed so that they protect buildings from wind and snow, yet not interfere with ventilation, particularly of livestock buildings. This means a 150-foot setback for the shelterbelt on all sides of naturally-ventilated buildings.
To avoid tree kill, shelterbelts used near open livestock lots should not be in the path of lot drainage.
For information on tree selection and placement for your particular soil, climate and topography, contact your county Extension office, the local Soil Conservation Service office, and state or federal Forest Service office.
* Since air infiltration is proportional to the force of the wind on the building, windbreaks reduce heat loss by decreasing wind velocity.
* A solid row of dense shrubs planted around the base of a structure tends to create a "dead air space" and thus improves the insulation value of the foundation or basement (or pit wall, in the case of a livestock building). This is particularly helpful if the foundation is not insulated.
* In summer, a properly-located shelterbelt can "channel" air currents to remove heat by increasing wind velocity around the house and farm buildings (Figure 7).
* Also, a dense tree area has a substantial cooling effect. On a hot summer day, there is up to a 10-degree difference in temperature between an open field and a grove of trees. This is more than shade effect. The leaves of one mature tree can evaporate over 200 gallons of water per day, producing evaporative cooling equivalent to an 8-10 room air conditioner!
* Energy savings of up to 20 percent can be realized by using windbreaks around heated buildings. This is because they reduce wind velocity, which decreases air infiltration into the buildings. Cold air will infiltrate all parts of a structure, but is most pronounced around doors and windows.
Aside from wind velocity, the amount of infiltration depends primarily on two factors: (1) quality of building construction, and (2) building orientation or direction faced. New, tightly-constructed buildings allow less infiltration than older, poorly-constructed buildings. Also, wind infiltration is minimized when buildings are oriented so the wind strikes the smallest possible wall projection. In most of the Midwest, this is when a building faces so its long axis runs east-west.
According to U.S. Department of Agriculture studies, windbreak protection for livestock raised in open lots improves feed efficiency for feeder animals and decreases death loss of young animals. Feeding tests with beef cattle in Canada confirm these findings; decreases in weight gain of cattle exposed to winter winds were cut 50 percent with proper wind protection.
A suitable windbreak not only checks strong winds but also protects animals from blowing rain, sleet and snow. The beneficial effect on animal productivity and comfort is created primarily by the decreased windchill factor.
Snow drifting can severely hinder cattle and hog feedlot operations. Animal performance suffers when feeders and waterers are covered with drifting snow, and animals can suffocate when snowdrifts cover low-profile sheds. Also, farmers cannot transport feed to feedlots easily over snowclogged roads.
Porous windbreak fences are probably the best solution for open feedlots. While solid fences provide better wind protection in the area next to the fence, porous ones protect a much larger area. A solid fence might be built as a section of the lot fence since it has a limited snow drop zone, whereas porous fences with twice as large a snow zone should be constructed some distance upwind from the lot.
Locate windbreaks to provide wind protection for outside feedbunks and to keep snow out of the feed alley and bunk areas. (See Table 2 for help in determining windbreak location.) Lots should always be designed with wind protection if cattle must face into the north or west wind while eating.
                   Snow        Wind
  Windbreak type   zone    protection zone
-------------------------------------------

  Solid fence       5H          15H
  Porous fence     10H          20H
  Shelterbelt   5H-10H      15H-20H
-------------------------------------------
A major problem with outside feed lots is how to channel wind currents between adjacent upright Silos and buildings, particularly when these structures are located on the north or west side of the lot. Winter winds swirling around a silo can actually increase in velocity. Even so, locating silos and feedbunks on the north, with appropriate wind control (e.g., 10-foot-high porous fences extending at least 30 feet on each side of the silo), is usually the best solution.
Silos on the east or south side shade the jot, and feedbunks oriented east-west shade the north side of the bunk apron. Both situations increase the potential for ice buildup in the lot during the winter months.
Tall buildings located on the downwind side of a lot can also divert high winds back into the lot and cause snow to be dumped there. While this is usually not too serious, it does merit consideration when planning the lot.
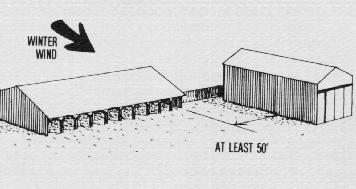
Buildings situated too close together can cause undesirable wind currents through the lot, creating a wind passageway or tunnel. If the situation already exists, the best solution is to block the wind by constructing a windbreak fence or stacking hay bales across the troublesome passageway. However, if you are still in the building planning stage, try to arrange it so buildings are at least 50 feet apart to prevent high velocity winds between them (Figure 8).
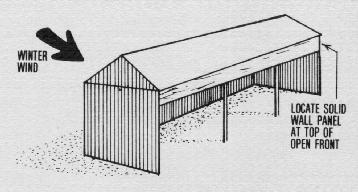
Long, narrow, open-front buildings (length being greater than 2 1/2 times their width) usually create more draft problems than short, wide buildings. This is especially true if the buildings have high eave heights.
If drafts occur, several modifications are possible, depending on where the wind enters the building. Draft origins can be determined through the use of a smoke generator.
If it is determined that drafts are coming around the endwall on the windward side, the best solution is to use a "swirl chamber." A swirl chamber is simply a porous fence located on the upwind side of the building (Figure 9). Ideally, it should be the same height as the building eave on the open-front side. Draft protection can also be accomplished by offsetting the lot fence where it joins the building, thus forming a swirl chamber.
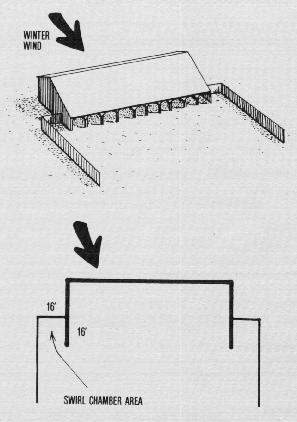
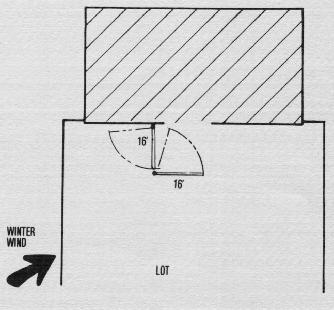
A windbreak fence should never connect to a corner of the building. Otherwise wind and snow can be funneled into the building itself. Keep the fence at least 16 feet away from the corner, extending it at least 16 feet out from the building as shown in Figure 9. If an access gate is needed through the swirl chamber area, construct one the same height and porosity as the rest of the windbreak fence.
Another way to prevent endwall drafts in an open-front building is to construct solid-partition walls parallel to the endwalls at spacings of about 50 feet (Figure 10). These walls should extend to the back of the building but need not be higher than the open front.
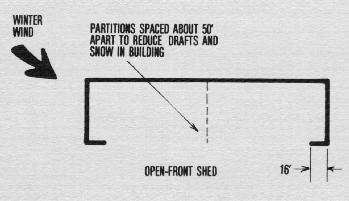
If a fenceline bunk and feed alley run along the back of the building, locate garage-door-type closures with automatic openers along the feed alley at each partition wall. Or close up the first 16 feet of open sidewall at each end of the building while leaving sections open at each end; this will only increase draft problems.
Drafts can also occur as wind passes over the roof of an open-front building. Wind swirling at the eave on the downwind side may draw wind and snow into the building. The air currents attempt to enter at a point just under the eave.
The slight vacuum causing this backdraft can be controlled by leaving an opening near the top of the rear wall (on the windward side) of the building (Figure 11). The size of this opening should be equal to the size of the ventilation opening at the roof ridge in a gable-roof building. Drafts can also be deflected by constructing a 2-foot-high, solid-wall section just under the eave that extends the entire length of the open front (Figure 12).
Poor location of an open-front building with respect to other structures can also cause severe draft and snow drifting problems. Therefore, never locate the open-front side of a building within 60 feet of an upright silo or other building.
When a new building is added to an existing feedlot, drafts inside the structure can be a problem if the animal entrance must be located on the north or west (windward) side. One solution is to place two solid partitions to form an "L" around the doorway as shown in Figure 13. The partitions should be at least as high as the door opening and hinged to fold out of the way during tractor scraping of the lot and building area.
In heavy snow areas, if several rows of buildings are located close together with their long axes perpendicular to prevailing winter winds, there may be a problem of excessive snow loading on roofs. To totally eliminate the problem, the buildings would have to be spaced about 150 feet apart. Since this is not usually practical, most farmers are better off simply to design roofs for the increased snow load when buildings must be located close together.
Farmers are often reluctant to locate buildings too far from public roads, because drifting snow could restrict access to them. Several steps can be taken to shield farm lanes from snow.
When a road is cut through a hill, wind blowing across the depression is slowed (because of turbulence), and snow drops out to drift and accumulate on the road. One solution is to place a porous snow fence 60 feet upwind from the area. Another is to create gentle slopes (no more than 1 foot vertical to 4 feet horizontal) at the sides of the road cut. In any case, cuts should have rounded edges, since steep drop-offs and sharp edges cause more wind turbulence, thus more snow accumulation.
Areas bordered by woven wire fencing or a row of trees can cause turbulence and drifting in the roadway. Therefore, do not border lanes, parking lots and farm courtyards with rows of trees or shrubs.
Drifting can be heavy when the terrain upwind is a broad, flat area or `sweep,' since wind coming off the sweep carries a full load of snow. Such an area may slope to a `focal point' where the problem is especially severe.
If possible, select for access roads those sites where drifting is minimal. In heavy snowfall areas, locate the road along a ridge, or elevate it 1-2 feet above the surrounding terrain. The wind velocity will increase slightly as it passes over the rise and prevent snow drop.
If you can, plan a year or two before laying a road. Walk the area after one or two snowstorms to identify the potential problem spots.
Most of the wind and snow-drifting problems on farmsteads can be "controlled" with properly-placed windbreaks or by modifying building construction. Not all of these changes are simple and inexpensive, but the rewards of such efforts on increased livestock production and worker comfort can be significant.
* Research by Dr. F. H. Theakston at the University of Guelph in Canada has provided the basis for much of the modern design concepts of snow and wind control on the farmstead.
North Central Regional Extension Publications are prepared as a part of the Cooperative Extension activities of the 13 land-grant universities from the 12 North Central states, in cooperation with the Extension Service-USDA. The following states have cooperated in making this publication available:
                           *Iowa State University
  *University of Illinois   Printing/Publications Bldg.  *Lincoln University
   1301 W. Gregory Dr.      Ames, IA 50011                900 Moreau Dr.
   Urbana, IL 61 801                                      Jefferson City, MO 65101
                           *University of Nebraska
  *Purdue University        Ag. Communications Dept.     *South Dakota State University
   MDC, 301 S. 2nd St.      Lincoln, NE 68583             Extension Building
   Lafayette, IN 47905					  Brookings, SD 57007
                            *Ohio State University
	                     2120 Fyffe Rd.
                             Columbus, OH 43210
New 3/83
For single copies of this and other NCR Extension Publications, write to the Publications Office, Cooperative Extension Service, in care of the university listed above for your state. For information about ordering quantities of this or other NRC Extension Publications, write or call the NCR Educational Materials Project Office, B-10 Curtiss Hall, Iowa State University, Ames, IA 50011 (phone 515/294-8602).
Programs and activities of the Cooperative Extension Service are available to all potential clientele without regard to race, color, sex, religion, national origin, age or handicap.
In cooperation with the North Central Regional Educational Materials Project.
Issued in furtherance of Cooperative Extension work, Acts of Congress of May 8 and June 30, 1914. in cooperation with the U.S. Department of Illinois, Indiana, Iowa, Kansas, Michigan. Minnesota, Missouri Nebraska, North Dakota, Ohio, South Dakota and Wisconsin. B. J. Liska, Acting Director, Cooperative Extension Service, Purdue University, West Lafayette, Indiana 47907.