Introduction
Principles of Heat Flow
Choosing the `Right' Insulation
  Types of insulation
  Considerations in selecting an insulation
Determining Insulation Levels Needed
Installing Insulation--Where and How
  Insulating the ceiling
  Insulating the roof
  Insulating the walls
  Insulating the floor and foundation
Maximizing Insulation Effectiveness
  Moisture protection
  Doors and windows
  Birds and rodents
Let's Review
Energy and how we use it are vital considerations today in the planning and construction of farm buildings. Until new sources of energy become readily available, there is no choice but to conserve the energy we have. Not only do you benefit, but Indiana and the nation as well.
When it comes to livestock structures, conserving energy means doing those things that reduce or eliminate wasted heat in winter and excessive heat build up in summer. The most effective conservation measure is proper insulation.
There are many advantages to insulating livestock buildings, including a lower heating bill, increased meat, milk or egg production, better general animal health, more comfortable working conditions, etc. And the benefits of insulating are realized as much in the summer as in the winter.
With high fuel costs, an insulation investment with a 20-30 year useful life can pay for itself in 2-3 years, depending on the building's present condition and intended use. For example, if an uninsulated 20-sow farrowing house in Indiana were insulated to the levels recommended in this publication, 60-70 percent less propane gas would be needed to heat it. At present fuel prices, that's a saving of at least $500 per year!
On the following pages, we will be reviewing the principles of heat flow, common sources of heat loss and the types of insulation materials available. Then we will discuss how to determine proper levels of insulation, how to install it and, finally, how to maximize its effectiveness. Understanding the principles presented here will make your decisions concerning alternate courses of action easier, either in planning a new building or making changes in an existing one to conserve heat energy.
Heat, measured in BTUs or calories, is a form of energy that you and your animals need for keeping warm. It can come from the sun, food or feed and from supplemental sources, such as a furnace. The level or degree of hot or cold is indicated by the temperature, measured in degrees Fahrenheit or Celsius.
When you feel hot air coming from a heater, you feel heat, not temperature. The thermometer simply indicates the degree or level of heat in an area at that moment.
The natural direction of heat flow is from the high temperature side of a wall or ceiling toward the colder side. Expressed another way, `cold' is the absence of heat (BTUs).
A temperature difference between two sides of a wall indicates that there are more BTUs on one side than the other. This causes the excess BTUs on the warm side to move toward the cold side, until both areas are the same temperature. One might say the difference in temperature is the `pressure' that causes the heat to equalize the temperature. Also, the rate at which heat moves is determined by the kind and thickness of the material (insulation) through which the heat must flow.
All materials conduct heat. Some, such as aluminum, copper, steel, concrete and glass, are good conductors of heat; whereas wood, paper and fibrous materials like fiberglass, mineral wool and cellulose are poor conductors.
The thicker the material and the lighter, fluffier (full of air pockets) or less dense it is, the poorer its heat-conducting ability. We call these materials insulation. Newer insulation materials, including urea-formaldehyde foam, polystyrene and polyurethane, are very light and porous, thus are even poorer conductors of heat.
The poorer the insulation material is in conducting heat and the thicker it is, the more `resistance' it has to the flow of heat. This resistance is measured in terms of R-value. The higher the R-value of a material, the better it is as insulation.
R-values of various insulating and building materials are compared in Table 1. Note the striking differences in heat flow resistance between insulation materials and building materials such as concrete, wood or metal siding. This is primarily due to differences in density.
                                                      R-value -
						  ------------------------------
    Material                                    Per inch      For thickness
                                              (approximate)     listed
--------------------------------------------------------------------------------
Batt and blanket insulation
  Glass wool, mineral wool or fiberglass            3.50
Fill-type insulation
  Cellulose                                    3.13-3.70
  Glass or mineral wool                        2.50-3.00
  Vermiculite, expanded                              2.20
  Shavings or sawdust                               2.22
Rigid insulation
  Expanded polystyrene. extruded, plain        4.00-5.00
  Expanded rubber                                   4.55
  Expanded polystyrene, molded beads                3.57
  Expanded polyurethane, aged                       6.25
  Glass fiber                                       4.00
  Polyisocyanurate with aluminum facing        7.20-8.00
  Wood or cane fiberboard                           2.50
Foamed-in-place insulation
  Expanded urethane, sprayed                        6.25
Building materials
  Concrete. solid                                   0.08
  Concrete block, 3 hole 8"                                        1.11
  Concrete block. lightweight aggregate, 8"                        2.00
  Concrete block, lightweight, holes filled with vermiculite       5.03
  Lumber, fir and pine                              1.25
  Metal siding                                                     0.00
  Metal siding, hollow-backed                                      0.61
  Metal siding, insulated-backed. 3/8"                             1.82
  Plywood, 3/8"                                     1.25           0.47
  Plywood, 1/2"                                     1.25           0.62
  Hardboard, tempered. 1/3"                         1.00           0.25
  Particleboard, medium density                     1.06
  Insulating sheathing. 25/32"                                     2.96
  Gypsum or plasterboard. 1 2"                                     0.45
  Wood siding, lapped, 1 /2' x 8"                                  0.61
Windows (includes surface conditions)
 Single glazed                                                     0.91
 Single glazed with storm windows                                  2.00
 Double pane insulating glass                                      1.72
 Triple pane insulating glass                                      2.56
Doors (exterior)
 Wood siding, beveled. 3/4" x 10"                                  1.90
 Metal, urethane core 1 3/4"                                       5.26
 Metal, polystyrene core 1 3/4"                                    2.13
Floor perimeter (per ft. of exterior wall length)
 Concrete, without perimeter insulation                            1 23
 Concrete, with 2" x 24" perimeter insulation                      2.22
Air space (3/4" to 4")                                             0.90
Surface conditions
 Inside surface                                                    0.68
 Outside surface                                                   0.17
--------------------------------------------------------------------------------
For example, the R-value of 1/2-inch plywood (.62) is about the same as 8 inches of concrete (.08 x 8.64). However, it would take about 3 inches of plywood or 44 inches of concrete to equal in insulation value just 1 inch of fiberglass batt or 1/2 inch of expanded polyurethane. Commercial insulation materials add substantially to the resistance of heat flow through wall and ceiling/roof areas as compared to conventional building materials!
The moisture-holding capacity of air doubles with each 20F rise in temperature. This principle explains why walls and ceilings become wet and drip.
Livestock add heat and moisture vapor to the surrounding air. So when warm, moisture-laden air in the animal environment contacts a cool surface, such as a poorly-insulated wall or ceiling, cold window or foundation, the air cools and can no longer hold as much water vapor. This causes condensation or `sweating.' If the surface is cold enough, this condensate freezes. Insulation prevents condensation by keeping the inside surfaces warm--i.e., above the `dew point' (saturation temperature of the air).
Most building materials, including insulation, are porous to the movement of moisture vapor. If vapor is allowed to move through insulated walls, condensation can occur in the wall cavity, thus wetting the insulation. The amount of condensation depends on: (1) the difference in temperature between the warm and cold sides, (2) resistance of the materials to the flow of moisture vapor, and (3) the amount of moisture in the air.
Movement of moisture through materials is caused by vapor pressure. Vapor pressure of warm air is higher than that of cooler air and, thus, `pushes' vapor through the wall toward the cooler side-unless there is special provision made on the warm (or inside) surface to obstruct or impede its flow.
These obstructions can be: (1) a sheet of nearly-impervious, 6-mil plastic film installed between the insulation material and inside wall surface, (2) a vapor flow retardant incorporated into the insulation material itself, or (3) insulation batts. blanket or board made with a special paper or aluminum foil barrier attached. Such obstructors of flow are called vapor barriers.
Table 2 snows the degree of resistance to vapor flow (expressed as `perms') of various vapor barriers and common building materials. For a barrier to be effective, it should have a perm rating of less than 1.0.
    Material                                 Perms
-------------------------------------------------------
Vapor barriers
  Aluminum toil, 1 -mil                       0.0
  Polyethylene plastic film. 6-mil            0.06
  Kraft and asphalt building paper            0.3
  Two coats of aluminum paint (in varnish)
   on wood                                   0.3- 0.5
  Three coats exterior lead-oil base on wood 0.3- 1.0
  Three coats latex                          5.5-11.0

Common building materials
  Expanded polyurethane, 1"                 0.4- 1.6
  Extruded expanded polystyrene. 1"           0.6
  Tar felt building paper, 15-lb.             4.0
  Insulation board, uncoated, 1/2"         50.0-90.0
  3-ply exterior plywood. 1/4"                0.7
  3-ply interior plywood. 1/4"                1.9
  Tempered hardboard. 1/8"                    50
  Brick masonry, 4"                           0.8
  Poured concrete wall, 4"                    0.8
  Glazed tile masonry, 4"                     0.12
  Concrete block, 8"                          2.4
  Metal rooting                               90
-------------------------------------------------------
  *From Midwest Plan Service, Agricultural Engineers
Digest. "Insulation and Hear Loss." AED-13. 1 perm grain of
water/hr./sq.ft./in of mercury pressure difference.
There is a variety of insulation materials from which to choose. Look for R-values on the bags or bales, and compare with the levels recommended in Tables 3 and 4 to determine how much insulation you need.
Batt and blanket insulation is available in thicknesses from 1 to 8 inches and in widths to fit 16-, 24-and 48-inch stud spaces. Batts are 4 to 8 feet long, and blankets up to 100-feet long. Materials are fiberglass, mineral wool or cellulose fibers, available with or without a vapor barrier attached.
          Material             Thickness
-------------------------------------------
     Wall insulation (R=13)*
      Fiberglass                 3 1/2"
      Polystyrene, molded beads  3 1/2"
      Polystyrene, extruded     2 1/2"
      Polyisocyanurate           1 3/4"
      Polyurethane, aged           2"
      Polyurethane, as formed    1 1/2"
     Ceiling insulation (R=20)*
      Vermiculite                  8"
      Fiberglass                   6"
      Cellulose fiber              6"
      Polystyrene, extruded        4"
      Polyurethane, aged           3"
      Polyisocyanurate
-------------------------------------------
  *Includes an R-value of 1 to 2 for wall linings and surface air
films
                                     Desired		  R-value for -
                                    temperature   -----------------------
    Facility                        range (F)     Wall    Ceiling OR Roof
----------------------------------------------------------------------------
Swine
  Gestation/finishing (50 to 220 lbs.)
   Modified open-front              45 to 85       13       20       13
   Shed with lot              Outside +/- 15                --        4
  Nursery (20 to 50 lbs.)           65 to 90       13       20       --
  Farrowing (300 to 400 lbs.)
   Bedded solid floor               60 to 85       13       20       --
   Slotted floor                    70 to 85       13       20       --
Dairy
  Total covered tree stall cold     25 to 85       13       --       13
  Free-stall with lot         Outside +/- 15                --        4
  Stanchion                         45 to 85       13       20       --
  Calf housing
   Hutch                      Outside +/- 15                --        4
   Bedded stall                Outside +/- 5                --        4
   Raised stall                     55 to 85       13       20       --
  Milking parlor                    40 to 85     4-13       20       --
  Milk house                        40 to 85     4-13       20       --
Beef
  Open shed with lot          Outside +/- 15                --        4
  Slotted floor               Outside +/- 15                --        4
Shops                               45 to 60       13       20       13
-----------------------------------------------------------------------------
*  Uninsulated
Loose-fill insulation is packaged in bags and may be mineral wool, cellulose fiber, vermiculite, granulated cork and/or polystyrenes. Some materials are easily adaptable for pouring or blowing above ceilings, in walls of existing or new buildings and in the cavities of concrete blocks. A separate vapor barrier must be applied to the inside wall or ceiling to keep the insulation dry.
Rigid insulation, available in block shapes or in 1/2 - to 2-inch thick panels up to 4 x 8 feet, is made of such materials as cellulose fiber, polystyrene, polyurethane and polyisocyanurate. It can be used on the inside or outside of roofs and walls, as a ceiling liner, or along foundations that are partially in the ground (perimeter insulation) or buried under concrete floors (if waterproof and if protected from physical damage). Rigid insulation must be adequately supported (at least 2 feet o.c.) when used in walls, ceilings or roofs. Some types have aluminum foil or other vapor barriers firmly attached to one or both faces to keep them dry. Check for flammability and whether they produce toxic gases when burned. If so, they must be protected with fire-resistant building materials, such as gypsum board or plywood. Check with your insurance company if in doubt.
Foamed-in-place insulation is usually obtained only through commercial applicators because it requires special equipment and experienced workers. It is available in liquid components or expansible pellets of polystyrene, polyurethane and urea-formaldehyde which are mixed or sprayed into cavities or onto surfaces. Sub-standard workmanship and application techniques can lead to excessive shrinkage, making insulation effectiveness less than desired. Also, a separate vapor barrier must be applied.
Sprayed-on insulations are difficult to protect with an adequate vapor barrier. As a result, they sometimes are subject to premature peeling from the surface on which they have been sprayed.
The insulation `best' for your needs will depend on the relative importance of the following factors:
Ease of installation. Are you planning to do it yourself? If so, can it be done without tearing off the siding or inner wall surface? Also, some materials are harder to handle or take more time to install, which increases the labor requirement. Others are irritating to the eyes and skin, requiring protective clothing and masks.
What is to be insulated? Will you have to insulate the ceiling where many inches of material may be needed, or will it be the wall or perhaps roof with limitations on thickness?
Fire resistance. Will the material require a plywood or metal liner to prevent rapid flame spread?
Animal contact. Will the insulation be exposed to physical damage and require a protective covering which adds to the total cost?
Cost. What would the different types of insulation cost considering preparation, installation, protection, etc., as well as purchase price? Variation in material and labor costs can be significant.
After choosing the types of insulation that would best fit your building, you must next determine the level of insulation needed and then decide on the best method of installation.
Proper insulation thickness in wall and ceiling/roof areas of a livestock structure is dictated by its intended use and the resulting need for heat conservation. Recommended minimum insulation R-values for specific types of buildings under Indiana conditions are shown in Table 4.
Open-front buildings need no insulation in the walls and just enough in the roof to prevent condensation by keeping the cold surfaces warm (R-value, approximately 4). Heated buildings should have a wall R-value of at least 13 and ceiling R-value of at least 20. Enclosed, unheated, naturally-ventilated buildings (modified open-front) should have wall and roof R-values of at least 13.
To compare your building with the recommended insulation minimums in Table 4, you must determine the overall R-value of its walls and ceiling or roof. To do this, first find in Table 1 the R-value for each material that makes up the walls and the ceiling/roof area; then add these figures together. Include in your total an R-value for inside and outside wall or ceiling/roof surfaces (bottom of Table 1), because the thin, stagnate film of air next to these surfaces contributes slightly to the overall R-value.
(Note: Windows, doors and foundations typically are high heat loss areas. These must also be taken into account when evaluating your building. Suggestions for minimizing heat loss from these areas are presented later.)
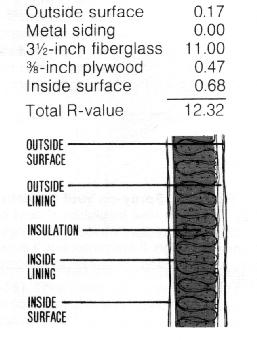
As an example, assume you want to determine the R-value of a hog house wall which has a stud cavity filled with 3-1/2 inches of fiberglass and lined with 3/8-inch plywood on the inside and metal siding on the outside. Using the information in Table 1, add the R-values, proceeding from the outside to the inside of the wall section:
A variation of this procedure may be used to determine the inches of insulation you would need in an uninsulated wall, ceiling or roof to obtain a specific desired R-value. Simply add the R-values of the various construction materials used; subtract that sum from the overall R-value you want; then divide that figure by the per-inch R-value (Table 1.) of the insulation you plan to use.
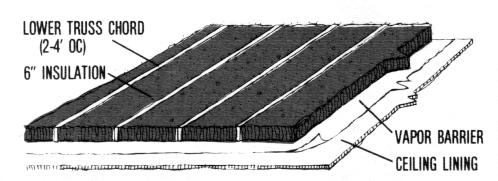
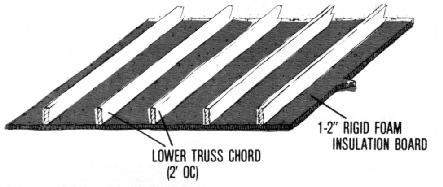
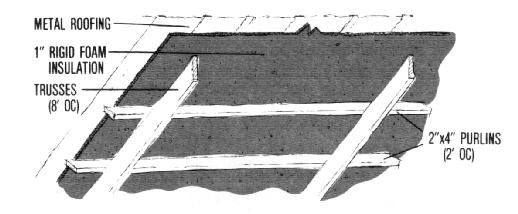
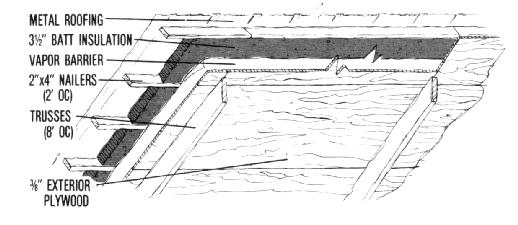
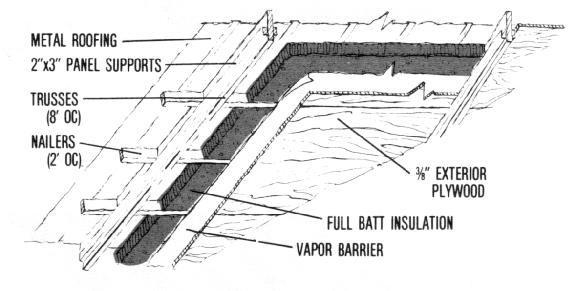
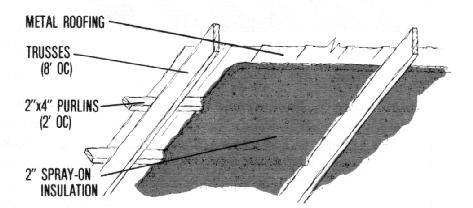
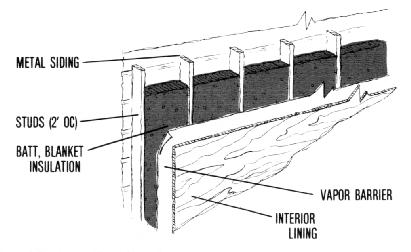
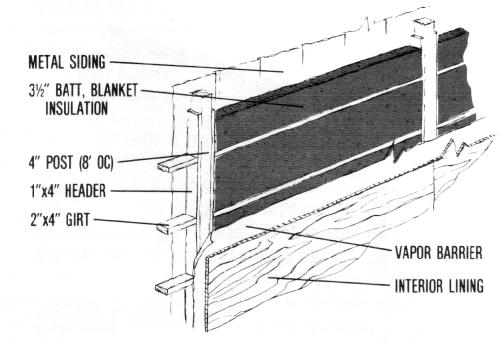
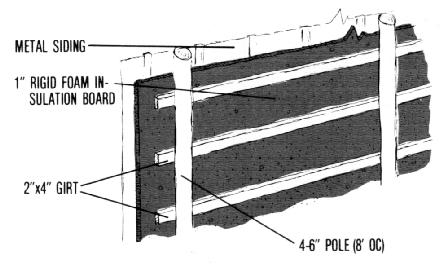
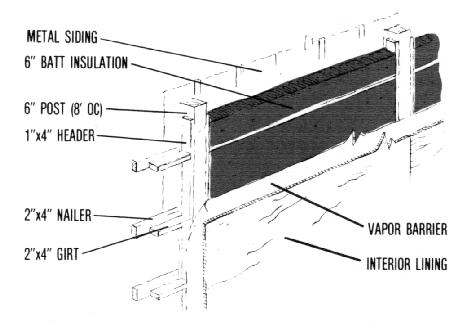
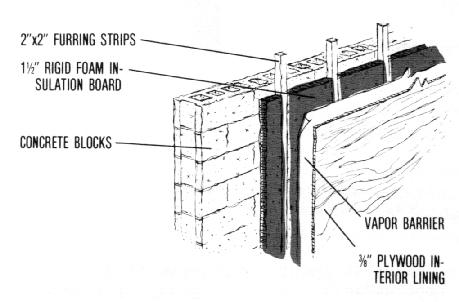
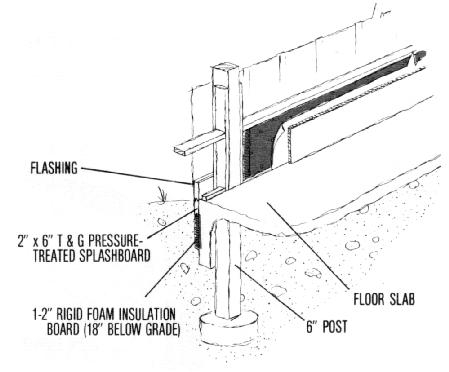
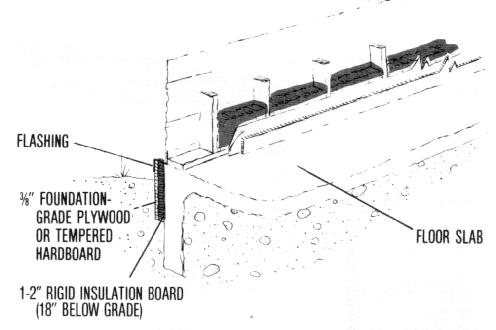
Figures 1 through 17 show the commonly-used construction methods for roofs, ceilings, walls, floors and foundations which employ insulation. If you have a choice. insulate the ceiling instead of the roof. You'll use 15 percent less insulation, the volume of space to be heated will be less, and mechanical ventilation systems will provide a more uniform air distribution.
Make sure that all cracks or openings around window and door frames, fuel supply pipes, water and sewer pipes, and electrical service entrance wires are carefully filled with insulation and covered with a vapor barrier. Such places, if not insulated, will show up later as cold spots, drafty areas, or where condensate or frost collects. Caulk all cracks and joints on outside surfaces that are exposed to wind and weather.

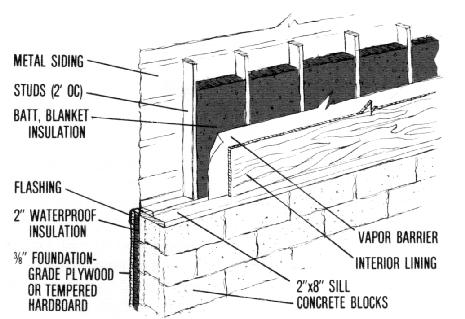
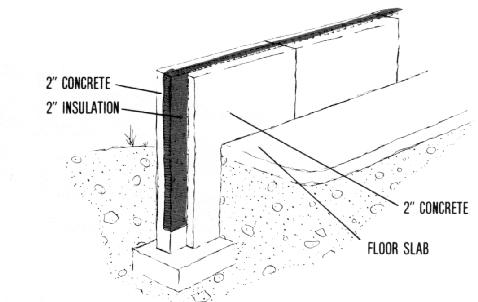
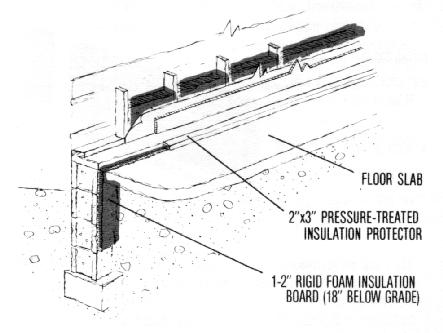
Perimeter insulation reduces heat loss through the foundation and floor and eliminates cold, wet floors. Insulation under the floor is not necessary unless the floor is heated. New pre-cast or cast-in-place foundations may have 2-inch insulation imbedded in the center portion.
New concrete block foundations or foundations under existing buildings may be insulated by covering the foundation exterior below the siding to 18 inches below ground line with 1-2 inches of rigid-foam insulation board. It should be protected with an impact- and moisture-resistant covering above ground. such as 3/8 inch foundation grade plywood or 1/4-inch tempered hardboard.
Insulation's effectiveness is reduced drastically if it becomes wet. Wet insulation not only permits greater heat loss, but also contributes to deterioration of the building's structural members.
For this reason, vapor barriers should be incorporated on the warm side of all insulated walls, ceiling/roofs, floors and foundations. This is especially important in livestock structures, where the relative humidity can be 80 percent or more and there is much moisture in the air. Many of the illustrations above show where these vapor barriers are to be applied.
Vapor barriers should be as perfect as possible. Unnecessary holes or tears become critical as you make the building `tighter' with heavy insulation, weatherstripping and caulking. Therefore, before putting the interior lining in place on the ceiling or wall, lay a solid film of 6-mil plastic over the studs and on the underside of the joists. (Clear plastic allows you to see the stud locations thus facilitating installation of the interior liner.) Overlap the edges several inches, then carefully staple in place. Surface-mount light switches and receptacles, electric wiring and waterpipes.
Overlaying a solid plastic film will allow you to use an insulation material with no vapor barrier attached, which is often less expensive than insulation with a self-contained vapor barrier.
A comparison of the permeability of various building materials to water vapor is shown in Table 2. Where possible, material with a permeability rating of less than 1.0 perm should be used.
Ventilation of the space above insulation in the ceiling or between the insulation and siding or roofing is important-sometimes critical. This is especially true in a livestock building where humidity is high and/or a pressure ventilation system is used. The pressurized air -- water vapor -- will be `pushed' into the wall and ceiling insulation if the vapor barrier is not perfect.
For ceilings, allow air to circulate in the attic space, entering and leaving through gable, roof or eave ventilators. Summer ventilation can be supplemented with fans to reduce heat buildup in the attic space. One of the most effective means of ventilating attics is to have air enter at the soffit and exhaust at the ridge.
Entry doors, insulated and weatherstripped, should be located on the downwind (south or east) side of buildings. If the entry must be on the upwind side of a heated building, plan for an air-lock type entrance, where the outer door is at least 4 feet from an inner door. This will prevent cold air and wind from blowing directly into the building when workers enter or leave. As a way to conserve floor area, consider making the air-lock entrance a part of an office, storage area or washroom.
If remodeling a building, consider closing up all windows with insulated panels, or replace them with permanent insulated wall sections. Hinged or removable panels can be used for summer ventilation.
There is little or no benefit to having windows or sky-lights in heated farm buildings. As evidence, compare the insulation R-values of single-, double- and triple-paned windows and storm windows (Table 1) with that of a well-insulated wall (R=13-15).
To prevent infestation and damage by birds and rodents, screen all vent openings and maintain a rodent bait program.
From the information provided here, you should be able to select for your specific farm buildings the type and amount of insulation and method of installation that will lead to effective energy conservation for years to come. Following is a brief summary of the points made in this publication to help you double-check your decisions:
Single copies of the following "Energy Management in Agriculture" publications dealing with various aspects of livestock housing are available free to Indiana residents from their county Cooperative Extension Service office or by writing to Media Distribution Center, 301 South 2nd St., Lafayette, IN 47905-1232:
Environmental Control for Confinement Livestock Housing (AE-96)
Natural Ventilation for Livestock Housing (AE-97)
Manure Pit Ventilation in Confinement Livestock Housing (AE-98)
Solar Heating Systems for Confinement Livestock Housing (AE-99)
Troubleshooting Livestock Environmental Control Systems (AE-100)
Wind and Snow Control for the Farm stead (AE-102)
Worksheet for Sizing Livestock Housing Environmental Control Systems (AE-109)
Investing in Insulation for Farm Buildings (ID-145)
Rev 5/82
Cooperative Extension work in Agriculture and Home Economics, state of Indiana, Purdue University, and U.S. Department of Agriculture cooperating; HA. Wadsworth, Director, West Lafayette. IN. Issued in furtherance of the acts of May 8 and June 30, 1914. Purdue University Cooperative Extension Service is an equal opportunity/equal access institution.