NCR-133
Paint is probably the most common exterior finish in use on wood today. It appears somewhere on practically every house and most commercial buildings. Even brick and aluminum sided houses usually have some painted wood trim. When properly applied to the appropriate type of wood substrate, paint can give a service life of up to 10 years. All too often, however, problems may develop during the application of the paint or the paint coat fails to achieve the expected service life. This bulletin will describe various paint problems and will provide information on how to correct or prevent them.
Paint properly applied and exposed under normal conditions is not affected by the first two to three years of exposure. Areas which deteriorate the fastest are those exposed to the greatest amount of sunshine and rain, usually on the south and west sides of a building. The normal deterioration process leads first to soiling or slight accumulation of dirt, and then to a flattening stage when the coating gradually starts to chalk and erode away. However, early paint failure may develop under certain abnormal conditions of service. Excess moisture, flat-grained wood, high porosity in paint and applying a new paint coat without proper preparation of the old surface can all lead to early paint failure.
The most common cause of premature paint failure on wood is moisture. Paint on the outside walls of houses is subject to wetting from rain and dew. Equally as serious is "unseen" moisture moving from inside the house to the outside.
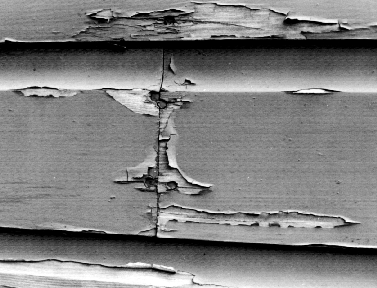
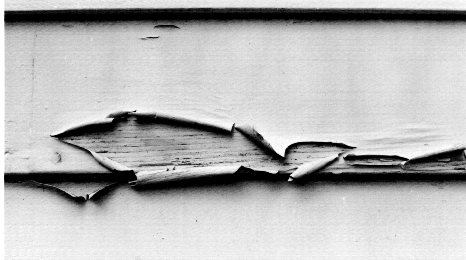
Outside moisture such as rain and dew can penetrate a paint coat and result in cracking, peeling, discoloration and premature paint failure. These problems may be observed in both heated and unheated buildings, are more pronounced on edges and ends of boards, especially in the early stages of paint failure (Figure 1), and are also observed where water is held on the surface. Problems often occur below roof valleys and corners where rain runoff from the roof wets the side wall excessively and below horizontal roof edges and roof valleys where ice dams develop. Porous paints are particularly vulnerable to moisture penetration.
Proper construction and maintenance will eliminate most exterior water problems. Adequate overhangs protect at least the upper portion of the house and properly maintained gutters prevent rain water splash. Flashing must be used at roof and wall junctions, around chimneys, over exposed doors and windows, where siding materials change, in roof valleys, on roof edges and other areas where moisture may penetrate into the house.
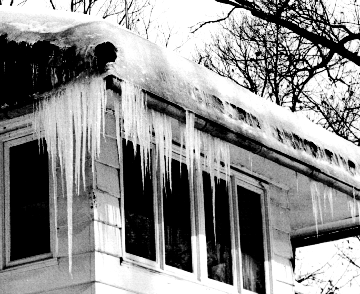
Ice dams (Figure 2) occur in cold northern climates when snow on the upper warmer parts of a roof melts and runs downward. As the melted snow reaches the roof overhang which is not heated, it freezes once more. With repeated thawing and freezing on the roof more water moves to the roof edge and an ice dam begins to build up. As warm weather occurs in the spring, additional melting further up the roof will occur, and this water will accumulate behind the ice dam. The melted water may penetrate the roof and drain into the exterior walls, thus causing moisture and associated paint problems. Ice dams can be reduced or eliminated by adequate insulation in attics and by proper attic ventilation.
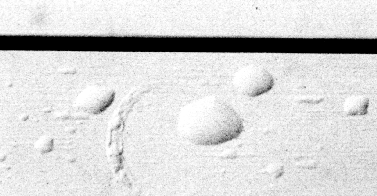
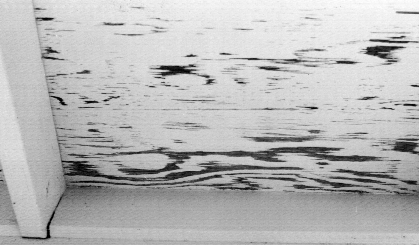
Inside moisture (water vapor) can destroy paint on the outside of a building by diffusing through the walls. Water vapor from cooking, dishwashing, clothes dryers, bathing and normal respiration by an average family of four can contribute three gallons of water per day to the humidity. Additional sources are humidifiers, unvented gas heaters and moisture moving into the living quarters from crawl spaces and wet basements. If the inside of all exterior walls does not have a vapor barrier or if the vapor barrier is improperly installed, water vapor passes into the walls during cold winter weather and condenses to a liquid. In very cold weather, it may form frost and melt as warm weather approaches (Figure 3). The water eventually soaks into the siding and wets the paint and is a common cause of blistering and peeling. The problem may be particularly pronounced around bathrooms, laundry rooms, kitchens and other areas of high humidity.

Interior water vapor can also move into the attic space and condense on the gable ends, causing paint peeling. Moisture may also condense on the attic side of the roof decking and eventually work its way down the side walls, causing paint peeling near the tops of these walls. To prevent condensation problems in the attic, it should be well ventilated. Gable roofs should have screened vent areas of at least one square foot per 300 square feet of ceiling area. Hip roofs should have continuous slotted vents in the eaves to allow air to enter the attic and ridge vents to allow its exit.
Condensation problems in cold climates are best prevented by installation of a continuous 6 mil polyethylene vapor barrier on the warm side of all exterior walls and ceilings. The vapor barrier should fit tightly around electrical outlets, doors, windows and other openings. A vapor barrier, sometimes called a soil cover, should be installed directly over the soil in all houses with crawl spaces. This will keep moisture from moving out of the soil and up into the living space and then through the walls and ceilings.
If a vapor barrier is absent, it can be installed under new paneling or dry wall. Two coats of soya alkyd resin paint or plastic-faced hardboard, and similar materials, may serve as a vapor barrier when applied over the existing walls. It should be recognized that these methods are generally not as effective as a properly installed vapor barrier of the film type.
To reduce water vapor in the house, vent high humidity areas such as kitchens and bath areas to the outside. Clothes dryers should be vented directly to the outside and not to the attic, basement or crawl space. Mechanical humidifiers add large quantities of moisture to the air and should not be used if paint peeling is a problem.
Temperature blisters are bubble-like swellings that occur on the surface of the paint film as early as a few hours or as long as one to two days after painting. They occur only in the last coat of paint (Figure 4). They are caused when a thin dry skin has formed on the outer surface of the fresh paint and the liquid thinner in the wet paint under the dry skin changes to vapor and cannot escape. A rapid rise in temperature, as when the direct rays of the sun fall directly on freshly painted wood, will cause the vapors to expand and produce blisters. Usually only oil-based paint blisters in this way. Dark colors which absorb heat and thick paint coats are more likely to blister than white paints or thin coats.
To prevent temperature blisters, avoid painting surfaces that will soon be heated. "Follow the sun around the house" for the best procedure. Thus, the north side of the building should be painted early in the morning, the east side late in the morning, the south side well into the afternoon, and the west side late in the afternoon. However, at least two hours should elapse before the fresh paint film cools to the point where condensation will occur.
If blistering does occur, allow the paint to dry for a few days. Scrape off the blisters, smooth the edges with sandpaper and spot paint the area.
Moisture blisters are also bubble-like swellings on the surface of the paint film. As the name implies, they usually contain moisture when they are formed. They may occur where outside moisture such as rain enters the wood through joints and other end grain areas of boards and siding. Moisture may also enter from poor construction and maintenance practices. Paint blisters caused by outside water are usually concentrated around joints and the end grain of wood. Damage appears after spring rains and throughout the summer. Paint failure is most severe on the sides of buildings facing the prevailing winds and rain. Blisters may occur in both heated and unheated buildings.
Moisture blisters may also result from inside liquid water moving to the outside. Plumbing leaks, overflow of sinks, bathtubs or shower spray and improperly sealed walls are sources of inside water. Such damage is not seasonal and occurs when the faulty condition develops.
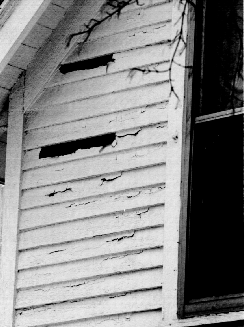
Moisture blisters usually include all paint coats down to the wood surface. After the blisters appear, they dry out and collapse. Small blisters may disappear completely, fairly large ones may leave a rough spot and in severe cases the paint will peel (Figure 5). Thin coatings of new, oil-based paint are the most likely to blister. Old, thick coats are usually too rigid to swell and form blisters. Therefore, cracking and peeling will usually result.
Elimination of the moisture problem is the only practical way to prevent moisture blisters in paint. The moisture source should be identified and eliminated to avoid more serious problems such as wood decay or rot and loss of insulating value.
Intercoat peeling is the separation of the new paint film from the old paint coat, indicating a weak bond between the two (Figure 6). Intercoat peeling usually results from inadequate cleaning of the weathered paint and usually occurs within one year of repainting. This type of intercoat paint peeling can be prevented by following good painting practices suggested under a later section entitled, "Repainting Procedures."
Intercoat peeling can also result from allowing too much time between the primer coat and top coat in a new paint job. If you wait longer than two weeks before applying a top coat to an oil-base primer, soap-like materials may form on the surface and interfere with the bonding of the next coat of paint. When the period between applications exceeds two weeks, scrub the surface before applying the second coat. Do not apply a primer coat in the fall and wait until spring to finish with the top coat.
A simple test can be conducted to determine if the new paint coat is likely to peel. First, clean the old paint surface. Then, repaint a small area with the new paint and allow it to dry for at least two days. Then, firmly press one end of a "band-aid" type adhesive bandage onto the painted area. Jerk it off with a snapping action. If the tape is free of paint, the new paint is well bonded to the old surface. If the new paint adheres to the tape, the old surface is too chalky and needs more cleaning or the use of an oil-based primer.
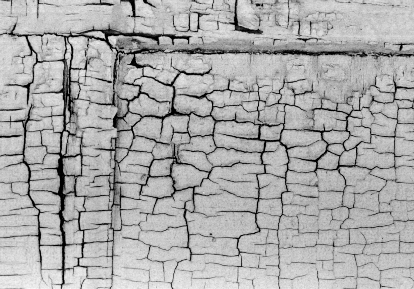
Cross-grain cracking occurs when paint coatings become too thick (Figure 7). This problem often occurs on older homes that have been painted several times. Paint usually cracks in the direction it was brushed onto the wood. Once cross-grain cracking has occurred the only solution is to completely remove the old paint and apply a new finishing system.
To prevent cross-grain cracking, follow the paint manufacturer's recommendations for spreading rates. Do not repaint unweathered, protected areas such as porch ceilings and roof overhangs as often as the rest of the house. If possible, repaint these areas only as they weather and require new paint. However, if repainting is required, be sure to scrub the areas with a sponge or bristle brush and detergent in water to remove any water-soluble materials that will interfere with adhesion of the new paint.
If a new paint coat is to be successful over a problem area, any moisture problems must be eliminated. Good surface preparation is also essential.
If the wood has been completely stripped or is being painted for the first time, it should be brush treated with a paintable water-repellent preservative or water-repellent. This treatment will reduce the uptake of moisture by the wood. After the water-repellent preservative or water-repellent has dried for at least two warm days, apply an oil-base primer or a stain-blocking latex primer, followed by at least one top coat of high quality acrylic latex paint. One top coat of paint should last four to five years, but two top coats can last up to 10 years.
If only isolated areas of the paint coat have failed by peeling to the bare wood, spot painting may be the best alternative. First, scrape away all loose paint. Sandpaper or "feather" the edges of any remaining paint smooth with the bare wood. Then clean the old painted surface by scrubbing with a sponge or bristle brush. Rinse the scrubbed surface with clean water. Wipe the surface with your hand. If the surface is still dirty or chalky, scrub it again using a detergent, and rinse with clean water. After the surface has been thoroughly dried, apply one coat of a paintable water-repellent preservative or water-repellent to the bare wood, being careful to liberally treat end and lap joints. Any water-repellent preservative or water-repellent on the painted surface should be wiped dry with rags. At least two warm days should be allowed for the water-repellent preservative or water-repellent to dry before painting. An oil-base primer or stain-blocking latex primer should be applied to the bare wood. At least one top coat to match the rest of the house should follow. Caulk large cracks and openings after treating and priming.
If intercoat peeling is a problem, clean and prepare the entire surface as described earlier. Then apply the desired top coat.
Where intercoat peeling has been a problem. it is particularly important to clean areas protected from sun and rain such as porches, eaves and side walls protected by overhangs. These areas tend to collect water soluble materials that interfere with adhesion of the new paint. It is probably adequate to repaint these protected areas every other time the house is painted.
If paint fails because of penetration of rain and dew through porous paint, clean and prepare the paint surface as just described. Then apply one coat of an oil-base primer and top coat with acrylic latex house paint. The oil-base primer will prevent penetration of the wood by rain or dew. To insure good adhesion. apply the top coat within two weeks of priming.
Soffit areas of most newer homes are constructed of plywood. Paint may sometimes peel in these areas because of the predominance of summerwood (wide bands of dense wood) and moisture entering through surface checks in the plywood (Figure 8). Failure can be prevented by using a top quality acrylic latex house paint over a stain-resistant latex primer or by using a plywood manufactured with a medium density paper overlay. frequently called MDO. MDO plywood is not always a stock item in lumber yards, but it can usually be ordered. It may be best to apply a penetrating stain wherever non-overlaid plywood is used for soffits.
Always use a high quality paint and apply it as recommended by the manufacturer. Do not skimp on the amount of paint. On the other hand. cross-grain cracking will result with excessively thick paint coats. Therefore. it is important that the paint weathers normally before repainting. Protected areas may be painted every other time. Research has shown that an entire paint film (consisting of a primer and one or two top coats) thickness of 4-6 mils, or about the thickness of a single sheet of newspaper, will result in the maximum service life.
The following are available from the Forest Products Laboratory, One Gifford Pinchot Drive, Madison, WI 53705-2398.
The following are available from the state Extension Services listed at the end of this publication.
"Discoloration of House Paint-Causes and Cures." NCR Extension Publication 134, revised 1988, 6 pp.
"Selection and Application of Exterior Finishes for Wood." NCR Extension 135, revised 1988, 8 pp.
"Finishing and Maintaining Wood Floors." NCR Extension Publication 136, revised 1988, 8 pp.
The following is available from the Superintendent of Documents, U.S. Government Printing Office, 710 North Capitol Street, Washington, DC 20402 (order by title and stock number).
"Finishing Wood Exteriors: Selection, Application, and Maintenance." USDA Agricultural Handbook No. 647, SN #0011-000-044-50-8, 1986, 56 pp. Price: $3.50 (subject to change without notice).
"Exterior Finishes for Wood." Bureau of Audio Visual Instruction, Box 2093, Madison, WI 53701.
Acknowledgment is given to the Forest Products Laboratory, Forest Service, U.S. Department of Agriculture. Madison, Wisconsin for financial assistance in support of the preparation of this publication.
Do not mix bleach with ammonia or with any detergents or cleansers containing ammonia! Mixed together the two are a lethal combination, similar to mustard gas. In several instances people have died from breathing the fumes from such a mixture. Many household cleaners contain ammonia, so be extremely careful with what types of cleaners you mix bleach.
Use caution with wood finishes which contain pesticides. When used improperly they can be injurious to man, animals and plants. For safe and effective usage, follow the directions, and heed all precautions on the labels. It is advisable to wear unlined protective gloves and to cover nearby plant life when using any material containing pesticides.
Avoid spraying a pesticide wherever possible. Drift from a pesticide, applied as a spray, may contaminate the surrounding environment.
Store finishes containing pesticides in original containers under lock and key--out of reach of children and pets and away from foodstuffs. Follow recommended practices for the disposal of surplus finishing materials and containers.
Note: Registrations of pesticides are under constant review by the Environmental Protection Agency and the Department of Agriculture. Use only pesticides that bear a Federal registration number and carry directions for home and garden use. Since the registration of pesticides is under constant review by State and Federal authorities, you should consult with a responsible State agency as to the current status of the pesticides discussed in this report.
Rev 3/88
Sponsored by the Cooperative Extension Services of Illinois, Indiana, Iowa, Kansas, Michigan, Minnesota, Missouri, Nebraska, North Dakota, Ohio, South Dakota, Wisconsin, and Lincoln University-Missouri. Printed and distributed in cooperation with Extension Service, U.S. Department of Agriculture, Washington, D.C.
Programs and activities of the Cooperative Extension Service are available to all potential clientele without regard to race, color, sex, age, national origin, or handicap.
In cooperation with the North Central Region Educational Materials Project.
Issued in furtherance of Cooperative Extension work, Acts of Congress of May Band June 30,1914, in cooperation with the U.S. Department of Agriculture and Cooperative Extension Services of Illinois, Iowa, Kansas, Michigan, Minnesota, Missouri, Nebraska, North Dakota, Ohio, South Dakota, and Wisconsin. HA. Wadsworth, Director, Purdue University Cooperative Extension Service, West Lafayette, IN 47907.